Finished at last!
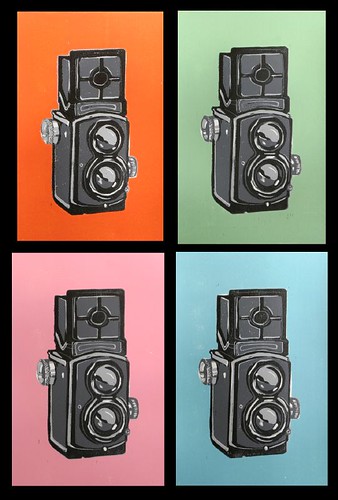
A four colour reduction woodcut of a classic twin-lens camera, printed in gradual stages over the summer (see posts below). We agonised over whether to go with 3 or 4 shades of grey, but we're pleased with how it finally turned out. This image was cobbled together in photoshop to show the four different background colours. We like blue and pink best at the moment, though green and orange aren't far behind!
Individual prints are available through our Etsy shop.
Sunday, 16 September 2007
TLR Print
Sunday, 2 September 2007
Etsy Etsy Etsy!
A Saturday Bread Adventure
We love making bread, and are always on the lookout for new things to try, so we thought we'd share a few of them on here.
Today - Pain a l'Ancienne (adapted from a Peter Reinhart recipe)
This one is slightly counter-intuitive if you're used to making normal bread. No laborious kneading and no leaving to rise in a warm place.
Ingredients:
14oz Strong White Bread Flour
1tsp Salt
1tsp Instant Yeast (we use Dove's Farm Quick Yeast)
10oz Ice Cold Water
Extra flour and semolina flour for dusting.
That's all.
1. Mixing - Chuck everything into a food processor with a metal blade attached. Pulse it until the dough forms a ball, then leave it to rest for 5 minutes. Then blitz for 45 seconds.

2. Lightly oil a large bowl and extricate the dough from the processor with a plastic spatula. The dough should be wet and sticky but not too sloppy.
3. Place the bowl in the fridge overnight.
4. First thing in the morning, take the bowl out of the fridge and allow the dough to come back to room temperature and start rising. Wait until it has doubled in size, which could take 2-4 hours.

5. Once the dough has doubled, pre-heat the oven to 250C, liberally flour the worktop and remove the dough from the bowl. A plastic spatula dipped in cold water helps here.
6. Stretch the dough into a rectangle about 7ins by 6ins. If its too sticky to manipulate sprinkle more flour over it. Don't be tempted to start kneading it, you want it to keep as much air as possible. Cut it into long pieces. We cut ours into three but you could do more if you want small baguettes. Allow it to rest for 5 minutes.

7. Prepare as many baking sheets as you need by putting a piece of siliconised baking parchment on each one and covering it with a layer of semolina flour.
8. After 5 minutes, transfer the bits of cut dough to the trays, carefully stretching out each one to the length of the tray. Spray them lightly with water and bung it in the hot oven.

9. Bake for 8 minutes, then turn them round if they are cooking unevenly. Another 8-10 minutes after this should finish them off.
10. Let the bread cool and then eat it!

Today - Pain a l'Ancienne (adapted from a Peter Reinhart recipe)
This one is slightly counter-intuitive if you're used to making normal bread. No laborious kneading and no leaving to rise in a warm place.
Ingredients:
14oz Strong White Bread Flour
1tsp Salt
1tsp Instant Yeast (we use Dove's Farm Quick Yeast)
10oz Ice Cold Water
Extra flour and semolina flour for dusting.
That's all.
1. Mixing - Chuck everything into a food processor with a metal blade attached. Pulse it until the dough forms a ball, then leave it to rest for 5 minutes. Then blitz for 45 seconds.

2. Lightly oil a large bowl and extricate the dough from the processor with a plastic spatula. The dough should be wet and sticky but not too sloppy.
3. Place the bowl in the fridge overnight.
4. First thing in the morning, take the bowl out of the fridge and allow the dough to come back to room temperature and start rising. Wait until it has doubled in size, which could take 2-4 hours.

5. Once the dough has doubled, pre-heat the oven to 250C, liberally flour the worktop and remove the dough from the bowl. A plastic spatula dipped in cold water helps here.
6. Stretch the dough into a rectangle about 7ins by 6ins. If its too sticky to manipulate sprinkle more flour over it. Don't be tempted to start kneading it, you want it to keep as much air as possible. Cut it into long pieces. We cut ours into three but you could do more if you want small baguettes. Allow it to rest for 5 minutes.

7. Prepare as many baking sheets as you need by putting a piece of siliconised baking parchment on each one and covering it with a layer of semolina flour.
8. After 5 minutes, transfer the bits of cut dough to the trays, carefully stretching out each one to the length of the tray. Spray them lightly with water and bung it in the hot oven.

9. Bake for 8 minutes, then turn them round if they are cooking unevenly. Another 8-10 minutes after this should finish them off.
10. Let the bread cool and then eat it!

Tuesday, 28 August 2007
Adana 8x5 Printing Press
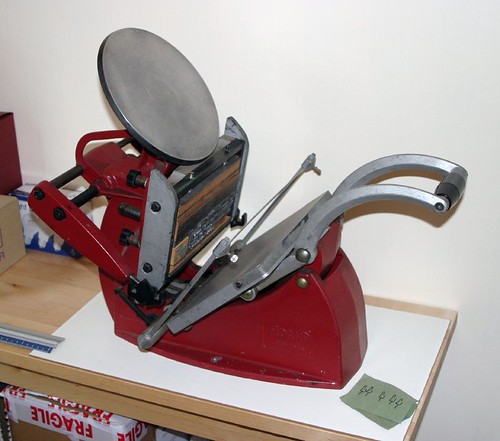
We have a press! Hooray! Its an old Adana Eight-Five (this refers to the size of the printing area - 8x5ins) currently missing its rollers and in need of a little TLC.
We're planning to use it to have a go at letterpress, which we've fancied for some time. We've already got a few fonts, most of which are now spread out across the dining room table while we sort them out. It'll also be used to print our engravings hopefully. We might have a go at that later this week if we feel brave enough.
The next job is to redo the packing on the platen. The manual says 10 sheets of newsprint ought to do it...
Sunday, 29 July 2007
Gratuitous Orange Roller Sunbeam Close-up

Gosh, its been over a month since the last post. How remiss of us. The wet July weather has meant lots of evenings and weekends stuck inside, which has at least allowed us to get on with some new projects. The main one of which seems to have involved buying lots of secondhand Penguin books!
Inspired by the Selenium print I did for the Periodic Table Project (see earlier posts), I've started another camera based print, this time using the Twin Lens cameras of the 1950s and 60s as a starting point. Its a woodcut in four colours from two blocks. Or rather two sides of the same block, which I thought might make registering them at least a bit easier. Here are the 4 different backgrounds which were printed in dribs and drabs over the last couple of weeks.

And this weekend I've printed the first of the three 'detail' layers, starting off in light grey, to be followed by two darker shades of grey to fill in the rest of the camera and outline the various knobs and levers. There were about 40 in total (prints, not knobs and levers, no camera's that complicated, surely?) all inked and burnished by hand as usual. No mean feat with my small girlish arms!


There is also another little wood engraving on the go, this one of St Winifred's Well in Shropshire where we spent a wonderful week at the end of April. Here it is, relegated to the far corner of the dining room table (the only part of the room that gets any natural light). The magnifier was a chance purchase off ebay, weighs approximately 4 tons and doubles as a spectacular lighter-of-candles if the evening sun comes in at the right angle. Hopefully this block should be finished and printed, at least in proof-form, by the end of the week, so look out for updates, the next of which should appear in less than one month this time!

Currently listening to: Joanna Newsom, The Milk-Eyed Mender
Thursday, 21 June 2007
The Box Man Cometh
Last weekend we tidied up the garden, which had been battered by several heavy storms. In the process we discovered we had far too many tomato and squash plants for our tiny patch, so decided to put the spares on Freecycle. They were soon snapped up by a very nice man, who by chance happened to be a cabinet maker with some surplus-to-requirements boxwood lying about in his workshop. Five plants for two nice little bits of seasoned boxwood seemed like a good deal all round!

The hard, closely-grained wood of the box tree has long been prized by wood engravers as the best wood for detailed engraving, and these days is very expensive and hard to come by. Our pieces will need to be cut and polished, but at this stage I think we'll leave them the shape they are rather than cutting them into neat rectangular blocks. Watch this space to see what happens!
Currently listening to: Harry Smith's Anthology of American Folk Music.
Saturday, 16 June 2007
Subscribe to:
Posts (Atom)


